Two Simple DIY Valentine's Crafts for Kids
The girls and I got creative this year on Valentine's gifts to give their friends. All three of my oldest are in the same Kindergarten class so I wanted to come up with something that was a little different and something they could all create together to gift the kids in their class. So I looked through our craft boxes and came up with a couple simple DIY projects that were both entertaining for them and super simple for mama (win win)!
It was fun to see them create something as they thought about each friend in their class and it made for a fun activity and memory we all go to do together. The best part is, this project is super cheap and very simple! I hope you enjoy and are inspired to create something like this with your kiddos too!
____________________
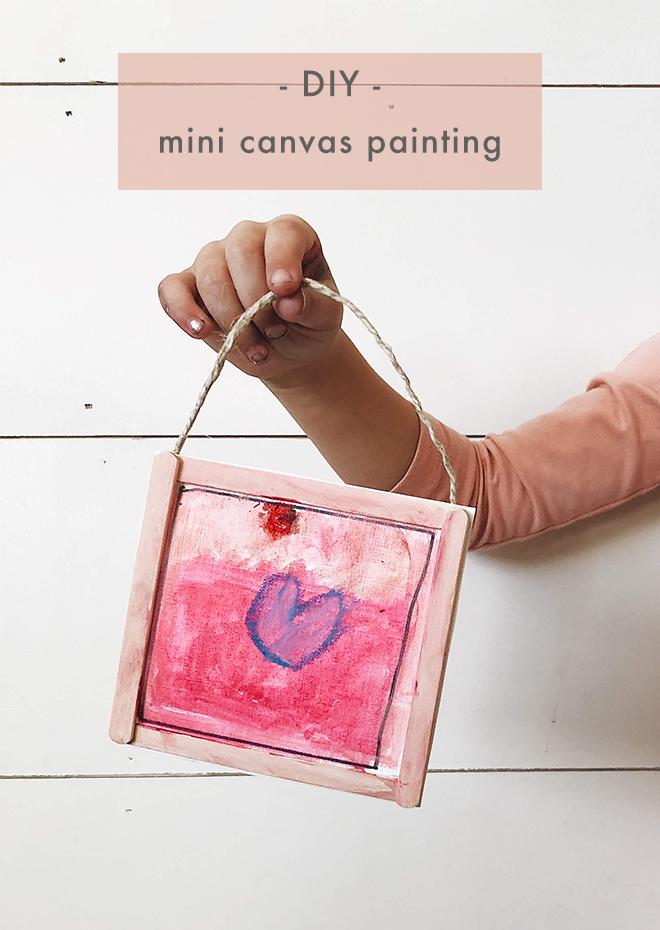
-DIY MINI CANVAS PAINTINGS-
**If you're on Pinterest be sure to Pin this Image below so you can save it and come back to it later!**


WHAT YOU'LL NEED:
-watercolor or acrylic paper (the heavier weight the better)
- wooden craft popsicle sticks
-paint colors of choice
- paint brushes
- hot glue gun + glue sticks
- scissors + twine
(All of these supplies can be found at Walmart craft section, Hobby Lobby, or Michaels craft store)

STEP 1:
Cut out squares of paper, roughly 4.5 x 4.5 inches
(enough to fit within the size of the framed sticks)
STEP 2:
Hot glue the sticks around the edges of the paper creating a frame
(I did this myself to prep the canvas' for the kids ahead of time, I didn't let my kids do the hot glue and I don't recommend kiddos doing that)
STEP 3:
Let the kids have fun painting and creating however their hearts desire!
STEP 4:
Once the paint is dry, turn it over and hot glue the twine on the back to hang up the canvas when it is finished!
And Voila! You're done!


Now you have a sweet piece of art from your kids to cherish for years to come! These would also be cute as unique gift toppers or mini canvas' you can paint on yourself in case you don't have kids to paint them for you :)

______________________
Our next project we did was a yarn keychain for each of the kids in their class. I thought it would be meaningful for the girls to give a friend a keychain with the first initial of their name so they could wear it on their backpack or use it somewhere around their home. This one required a little more help from me, but I think if your kids are a little older it is totally doable for them.
DIY YARN INITIAL KEYCHAIN
**Be sure to pin this image so you can come back to this tutorial later on!**

WHAT YOU'LL NEED:
-Yarn any color of choice
-pencil
- cardboard scraps
(I used a box we were recycling, I recommend cardboard from a shipping box or something at least this thick to hold up the yarn)
-scissors
-ball and chain for the ring
( I purchased mine from Amazon, there are a lot of options there for these)
-hot glue gun + glue (optional)

This one requires more gluing, so make sure the glue is dry before passing it off for them to start so they don't get burned by the glue
STEP 1:
Pencil sketch your initial in block letters onto the cardboard, be sure to make the letter wide enough so it won't be too thin and fall apart when cutting it out
STEP 2:
Cut out your initial letter
STEP 3:
Take your yarn and grab one end to start wrapping onto your cardboard. Place a dot of hot glue onto the corner you are going to start on your letter then place the yarn on top of that to stick.
STEP 4:
Once the glue is dried start wrapping your yarn around the cardboard letter. There is no right way to wrap the yarn, just wrap in any direction you'd like, enough to start covering up all the cardboard underneath.
STEP 5:
Once your letters in fully wrapped in yarn, take the hot glue again and glue the end of the yarn onto the back to secure the yarn in place.
STEP 6:
Once the glue is dry, take your ball and chain and squeeze it through a few pieces of yarn towards the top of your letter. I made sure the chain was underneath the yarn enough so it felt secure in there.
And that's it! Now your kids can attach it to their backpacks and show it off!


